Following on from our first blog on how to inspect suspicious emails, this part looks at what Microsoft 365 administrators can do to prevent suspicious emails getting to users in the first place.
Introduction
From an administrator’s perspective, when it comes to security protections email is still complicated to properly set up.
As with many areas of cyber security, there are a raft of expensive options for enterprises but not so much within the budget of smaller companies. Of course, there are relatively expensive options for enterprise email security from Mimecast, Proofpoint, Symantec et al. All these applications can be effective, but anecdotally do require regular administration and can annoy users.
In defence of administrators everywhere, there’s an impossible balance to achieve between stopping all bad things without ever blocking legitimate emails getting through: set it too aggressive and people will miss proper emails; too permissive and malicious stuff will get through.
Microsoft 365 Email Protections
For Microsoft 365 administrators, after making sure your SPF, DKIM and DMARC are all configured, the next step is to enable all of the protections already available to you.
Tedious Licensing Pre-Requisite
There’s likely a license caveat here: whilst everyone using Microsoft 365 gets the default protections (called Exchange Online Protection), we’re assuming at least Business Premium licenses all round. This includes Defender for Office Plan 1 (not to be confused with Defender for Business, which is endpoint detection and response, and is also included in Business Premium).
You can pay to upgraded to Defender for Office Plan 2, which seems to be more focused on investigation, response and training:
| Microsoft Defender for Office 365 P1 | Microsoft Defender for Office 365 P2 |
|---|---|
| Prevents broad, volume-based, known attacks. Protects email and collaboration from zero-day malware, phish, and business email compromise. | Adds post-breach investigation, hunting, and response, as well as automation, and simulation (for training) |
(from Microsoft)
Getting Started
All the email security settings can be currently found (we all know that they’re always moving stuff around) in the Security Threat Policies panel:
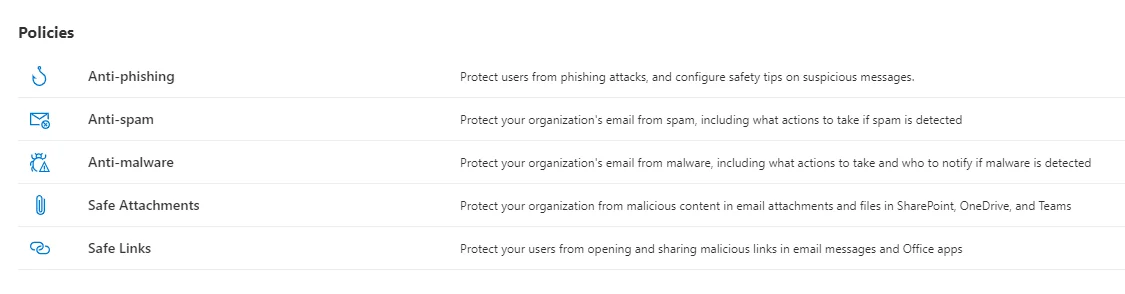
From the same panel, we’ll also need the Quarantine Policies. In fact, as the quarantine policies affect the setup of a few of the other protections, it’s a sensible place to start.
Quarantine Policies
The policies you set up here will come into play for any email that is detected as suspicious and ends up in Quarantine instead of the user’s Junk folder (or is rejected by the tenant). A single quarantine policy let’s you set what actions a user can perform on an item in quarantine, as well as whether they’re notified. As the documentation says, quarantine policies let you define:
- What users are allowed to do to their own quarantined messages (messages where they’re a recipient) based on why the message was quarantined.
- Whether users receive periodic (every four hours, daily, or weekly) notifications about their quarantined messages via quarantine notifications.
There are some built-in policies that are used by default elsewhere; for example, the AdminOnlyAccessPolicy is now a requirement for high-confidence phishing emails (we’ll come to what that is later), and means only Admins can release those items from quarantine.
You may want a custom policy here to strike the right balance between allowing people to manage their own quarantined emails (and therefore reducing the need to admins to do so), and making sure security or tenant administrators get the visibility they need.
You’ll probably make use of the AdminOnlyAccessPolicy for some of the following settings, especially the malware settings. That means someone with admin access needs to check the quarantine regularly - it does help to submit true and false positives to Microsoft.
Short-Cuts
There are some high-level preset policies, which allows you to enable stricter policies for some users:
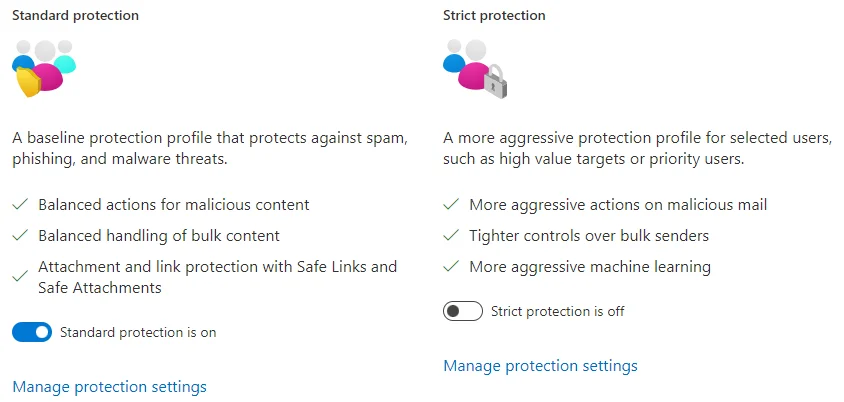
As the screenshot shows, these allow you to quickly enable standard and strict protection for all or specific users. An example here might be standard protection enabled for everyone, and strict protection for higher-risk staff such as company directors, executives, and finance.
Anti-Phishing Threat Policies
Firstly, there’s the Anti-Phishing policies. These have a default policy, Office365 AntiPhish Default (Default), which typically needs improving. There’s a single slider to affect the aggressiveness of phishing detection:

It’s the perfect metaphor for the whole problem with email protection; there’s likely no perfect position for any one organisation, so you have to choose whether you prefer more phishing getting through over more legitimate email getting blocked as a false-positive.
As you can see, we’ve currently got ours set to 2/4, largely because we recently dropped it after a complaint about false positives. It’ll probably go up and down a number of times before we settle on an acceptable middle ground.
The other settings fall into two categories, for some reason. There’s a link to Edit protection settings, and right at the bottom another link to Edit actions.
Protection settings includes the following:
- Impersonation settings for users, which is worth enabling with all users, or at the very least higher-risk users.
- Impersonation settings for domains.
- Conversely to the above two, trusted senders and domains.
- Three intelligence settings.
Generally, most of the settings can be enabled without much risk of false-positives.
The Edit Actions part lets you specify what happens when the different phishing protections are triggered. For most people this will normally be a choice between redirection, junk and quarantine. Pushing emails to quarantine bring the different quarantine policies into effect.
It’s easier for users to move an email from junk than it is to release it from quarantine, so moving to junk is the best option for many scenarios here. The exception might be DMARC failures, which can be quarantined or rejected.
Finally, all the safety tips, which in the last blog we told users to pay attention to, are all worth enabling.
Anti-spam
The anti-spam policies are divided into incoming and outgoing - for most people the former are way more important.
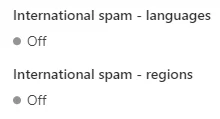
As with the phishing settings, for the inbound spam protection we have a high-level slider for detection aggressiveness, although this time it’s called a threshold. Ours is set to 6, if you are interested. Pretty much all the other options are the different detections that can raise the spam score of a given email. And most of them are worth enabling. The only possible exceptions are the final two, which allow you to rate emails from certain countries or in certain languages as likely spam:
The outbound settings are only triggered if internal users send too many emails, which should only happen if their account is compromised. Whilst less important than the inbound settings, it’s perhaps still worth setting a message threshold and enabling notifications in case it does ever happen.
Anti-malware
It’s probably worth being more aggressive with the anti-malware settings, as they are arguably the most important protection. All the settings are worth enabling, and quarantine with the AdminOnlyAccessPolicy is a better option than rejection, as you at least get visibility of what’s happening.
The common attachments filter could be improved - for example we recently added .shmtl to the list after some customers received malicious files of that type. The extensions for macro-enabled Office documents (.docm, xlsm etc) are also sensible additions for most companies.
Whilst it’s not the focus of this blog, we’d be remiss not to mention that device protection is the second best defence when it comes to malicious attachments, so make sure you have decent, centralised anti-virus/endpoint-protection/whatever-we-call-it-now installed. If you already have Business Premium licenses then you already get Defender for Business.
Other Tips
Another useful feature is the option to tag all emails from external sources with an External tag, which works in the web and local application versions of Outlook:

This can be done with the ExchangeOnline PowerShell module, and the command:
Set-ExternalInOutlook -Enabled $true
There’s more on that, and on adding custom notifications, in this great blog.
Outlook Add-Ins
Finally, as well as the View Headers add-in mentioned in the previous blog, there is also a
Report Phishing add in, which lets users submit suspicious messages for inspection.
- How to Check Suspicious Emails
- Are your domains protected from spoofing and phishing attacks?
- Email Security - The Basics

|
Scott is a technical cyber security professional with over fifteen years’ experience across a broad range of roles within the public and private sectors. With a deep understanding of cyber security, he has in his career focused on applied cryptography, network technologies, digital forensics and security research. At Red Maple he leads the delivery of all of our cyber security services. |