If you have an IoT device that you want to inspect or analyse, this blog details how to configure a network monitoring setup using a Windows laptop that has two network interfaces (Wi-Fi and Ethernet), VMware and the bridged network feature.
Background
I recently ran into the problem where I needed to build a network interception capability for an IoT device, but didn’t have a spare Wi-Fi USB adapter on hand. Normally I would set up a Wi-Fi network, configure some port forwarding and connect the desired device to it. A few years ago I wrote a blog post about this approach.
My work laptop has two network interfaces (Wi-Fi and Ethernet), and so it too could be used for network interception, just like with the USB Wi-Fi adapter. However, it turns out that it’s not as straight forward as I thought, particularly if using a virtual machine. And so I decided to write this short blog post explaining how I solved it.
Diagram of setup

Requirements
For this setup you’ll need the following:
- VMware workstation.
- A laptop with two network interfaces, for example Wi-Fi and Ethernet.
- A spare ethernet cable.
VMware Host Configuration
Create a new virtual network
Since we are using a virtual machine for the actual traffic interception, we need to create a new virtual network. This will then need to be configured and assigned to the virtual machine guest.
In the VMware application window, head over to Edit > Virtual Network Editor, and click on Change Settings (this requires admin rights). Next, add a new network; e.g. I picked VMnet7. Also make sure the type is set to bridged and assigned to your Ethernet interface.
Here is a screenshot of the settings on my machine:
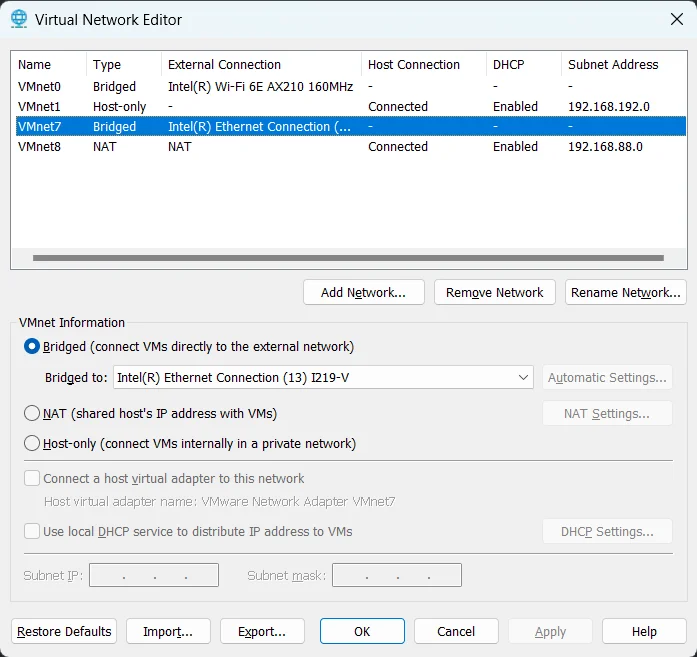
As shown, I have two network interfaces that are bridged - the default VMnet0, and VMnet7, the one we just created.
Change ethernet IP settings
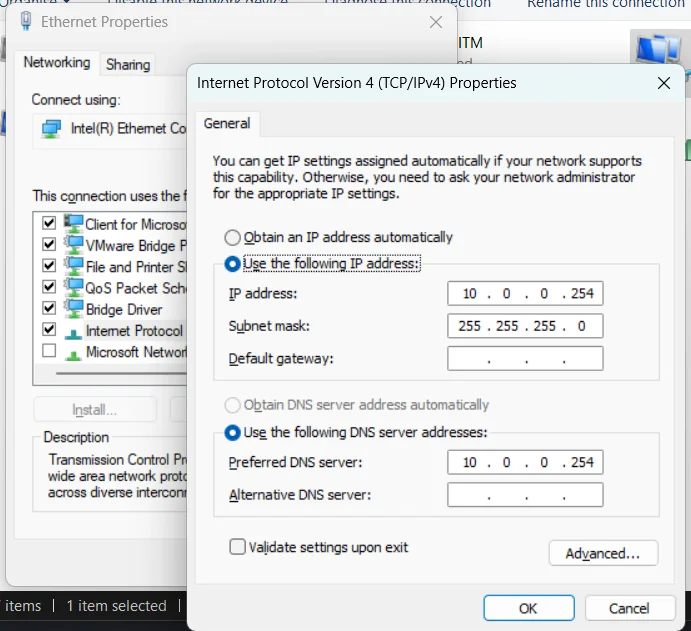
To stop your system from losing Internet connectivity whenever two network interfaces are connected, i.e. the Wi-Fi adapter and the Ethernet interface, we must change a few settings. Specifically, setting a static IP address on the Ethernet interface, or the one that we will be using as a bridge for VMware virtual machines.
In the Windows search, type Network, and you should see View network connection; open it.
Right click on the Ethernet adapter, and click on Properties. Next, select Internet Protocol Version 4 and click on Properties. Finally, set a static IP address for the interface and a subnet mask. It should match the default gateway you will configure in the next section. For example, I set my gateway as 10.0.0.254, which will also have to be set in the virtual machine too.
You can go ahead and disable IPv6 (unless you specifically need it).
VMware Guest Configuration
Adding virtual network to guest
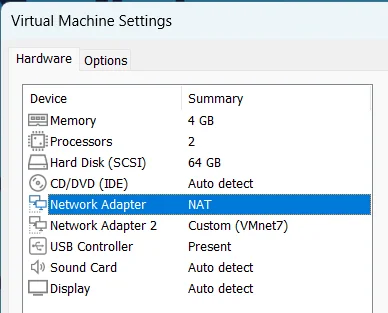
Now add the newly created bridge network to the guest machine. There should now be two network interfaces - one for Internet connectivity, typically the NAT interface, and one for the network interception, in our case the VMnet7 interface.
If this is properly set up, when you start your virtual machine you should see two network interfaces. For example, here is output of the ip a command which shows network interfaces details:
┌──(naz㉿kali)-[~]
└─$ ip a
1: lo: <LOOPBACK,UP,LOWER_UP> mtu 65536 qdisc noqueue state UNKNOWN group default qlen 1000
    link/loopback 00:00:00:00:00:00 brd 00:00:00:00:00:00
    inet 127.0.0.1/8 scope host lo
       valid_lft forever preferred_lft forever
    inet6 ::1/128 scope host noprefixroute
       valid_lft forever preferred_lft forever

2: eth0: <BROADCAST,MULTICAST,UP,LOWER_UP> mtu 1500 qdisc fq_codel state UP group default qlen 1000
    link/ether 00:50:56:33:41:15 brd ff:ff:ff:ff:ff:ff
    inet 192.168.88.133/24 brd 192.168.88.255 scope global dynamic eth0
       valid_lft 1638sec preferred_lft 1638sec
    inet6 fe80::250:56ff:fe33:4115/64 scope link proto kernel_ll
       valid_lft forever preferred_lft forever

3: eth1: <NO-CARRIER,BROADCAST,MULTICAST,UP> mtu 1500 qdisc fq_codel state DOWN group default qlen 1000
    link/ether 00:0c:29:ec:26:f0 brd ff:ff:ff:ff:ff:ff
Note that on other Linux systems the network interfaces may be named ens0, ens1 or similar.
Configuring guest network interface
Edit the /etc/network/interfaces file and replace the interface names and/or the IP address for intercept interface. Leave the rest as is:
# This file describes the network interfaces available on your system
# and how to activate them. For more information, see interfaces(5).

source /etc/network/interfaces.d/*

# The loopback network interface
auto lo
iface lo inet loopback

# The primary network interface
allow-hotplug eth0
iface eth0 inet dhcp
    metric 100
    dns-nameservers 1.1.1.1

# The secondary network interface
allow-hotplug eth1
iface eth1 inet static
    address 10.0.0.254/24
    netmask 255.255.255.0
    gateway 10.0.0.254
    metric 200
The configuration file sets up two network interfaces. A primary interface eth0 that uses DHCP for getting an IP address, and a secondary interface eth1 that uses a static IP address - this is our interception network. The metric option sets the priority and is very important because without this you will have problems when two or more network interfaces are assigned. This configuration ensures the primary network intefaces always has the priority, as it should, since it provides Internet access.
You may also need to set the IP address manually, e.g.:
ipconfig eth1 10.0.0.254 netmask 255.255.255.0
Enable network forwarding
Edit the /etc/sysctl.conf file and uncomment this line:
net.ipv4.ip_forward=1
Or type:
sudo sysctl -w net.ipv4.ip_forward=1
IMPORTANT: You also need to add the following iptables rule to enable Internet connectivity!
sudo iptables -t nat -A POSTROUTING -o eth0 -j MASQUERADE
Create a dnsmasq configuration
Warning: You may already have a DNS resolver running on your Linux system, which means that
dnsmasqcannot start because it’s using the same port. More than likely, it will be the resolver service. You can check if it’s running viasystemctl status resolver.
If you haven’t already installed dnsmasq, go ahead and install it with: sudo apt-get install dnsmasq. And then, create a configuration file /etc/dnsmasq.conf with the following settings:
# Interception Interface
interface=eth1

# DHCP server and range for assigning IP addresses
dhcp-range=10.0.0.1,10.0.0.100,96h

# Broadcast gateway and DNS server information
dhcp-option=option:router,10.0.0.254
dhcp-option=option:dns-server,10.0.0.254
Be sure to replace the interface and IP address range with your own settings, or just keep copying me. Finally run dnsmasq with the above configuration, I use the option -d to ensure the process is not daemonised (so we can see logs), this is not required but is helpful:
sudo dnsmasq -C /etc/dnsmasq.conf -d
Usage Modes
There are two modes of operation. A passive mode that acts as a simple network tap, allowing us to passively intercept network traffic with tools such as wireshark and tcpdump. And an active mode that forwards network traffic to a man-in-the-middle proxy that is capable of viewing encrypted content. This also requires adding additional iptables rules and knowing what ports to forward.
Using the passive mode as the initial test is what I’d recommend, as it gives a nice overview of what a device is connecting to. But more importantly, the destination address and ports, and the protocols used. This information can then be used for setting up the active mode to perform more granular inspection of encrypted protocols.
Passive Mode
For passive mode, run the dnsmasq tool, making sure you also have this rule enabled to allow Internet connectivity:
sudo iptables -t nat -A POSTROUTING -o eth0 -j MASQUERADE
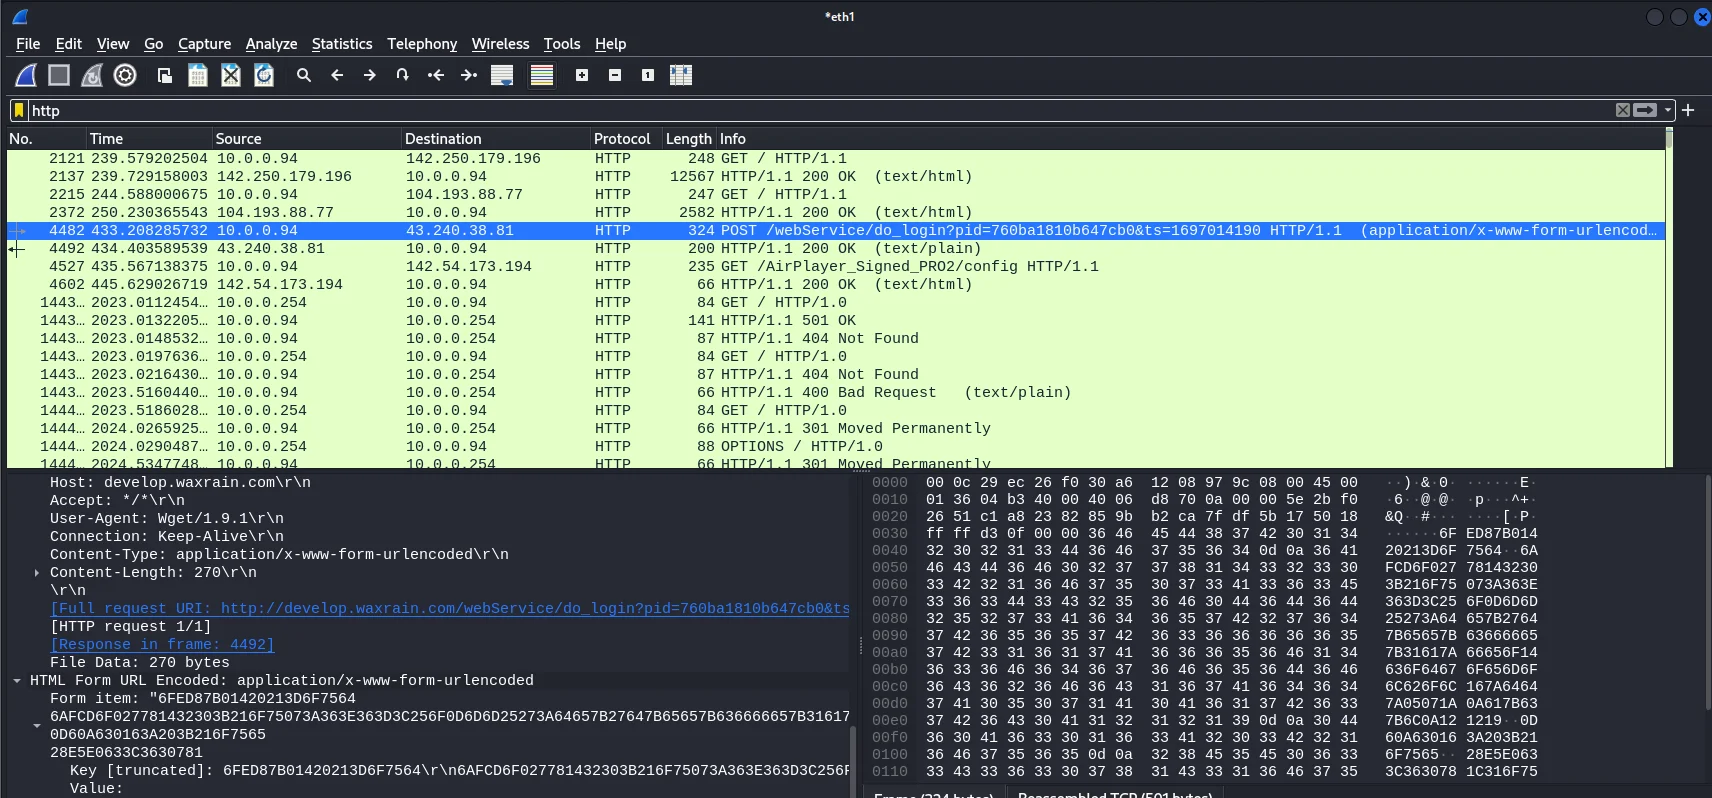
Connect the ethernet cable and power on the device under test. Here is some example HTTP traffic that I captured using Wireshark. The IoT device automatically got an IP address of 10.0.0.94 from our dnsmasq server. And was sending some random data to an HTTP server:
Active Mode
For active mode, run the dnsmasq tool and make sure you have the following rules enabled. These commands create a network forwarding rule in the NAT table. Any TCP traffic on ports 80 and 443 will be redirected to the the running proxy server on port 8080.
sudo iptables -t nat -A PREROUTING -i eth1 -p tcp --dport 80 -j REDIRECT --to-port 8080
sudo iptables -t nat -A PREROUTING -i eth1 -p tcp --dport 443 -j REDIRECT --to-port 8080
sudo iptables -t nat -A POSTROUTING -o eth0 -j MASQUERADE
Setting up a man-in-the-middle proxy is not covered in this post, but it is something we’ve covered before for mobile devices.
Note: The iptables rules by default do NOT survive reboots. You will therefore need to add the rules again after a reboot. Otherwise, look at installing iptables-persistence to save the rules.
Bonus
Get a unique list of DNS queries
From a wireshark capture file, we can use tshark and sort -u to quickly get a list of DNS requests with the following command:
tshark -r initial-bootup.pcapng -T fields -e dns.qry.name | sort -u
...
cbphe.com
android.apis.google.com
android.clients.google.com
android.googleapis.com
www.baidu.com
www.googleapis.com
www.google.com
www.gstatic.com
wx1.adgomob.com
Get all TLS Client Hello hostnames
When a client initiates TLS with the 4-way handshake, it first sends a “Client Hello” message. This message includes a useful field, tls.handshake.extensions_server_name, which shows the hostname of the certificate that is being used.
Another useful field is the tcp.dstport, which specifies the destination TCP port.
Here is some example output:
tshark -r reset-and-updater.pcapng -T fields -e tls.handshake.extensions_server_name -e tcp.dstport -R tls.handshake.extensions_server_name -2 | sort -u
...
android.apis.google.com 443
android.googleapis.com  443
connectivitycheck.gstatic.com   443
mtalk.google.com        5228
play-fe.googleapis.com  443
play.googleapis.com
play.googleapis.com     443
plbslog.umeng.com       443
rr1---sn-5hneknek.gvt1.com      443
rr1---sn-5hneknes.gvt1.com      443
rr2---sn-5hneknes.gvt1.com
ulogs.umengcloud.com    443
ulogs.umeng.com 443
www.googleapis.com      443
www.google.com  443
www.gstatic.com 443

|
Naz is an OSCP-certified technical cyber security professional with experience in security and penetration testing, and vulnerability research. Naz has found credited vulnerabilities in hardware devices, mobile and web applications. At Red Maple he helped to deliver our cyber security consulting services, until his departure in April 2024. He still blogs on his personal blog. |