
A how-to guide on setting up a StrongSwan IPSec (IKEv2) VPN server with mitmproxy to securely monitor and intercept HTTP/HTTPS network traffic, which aids mobile app analysis for both Apple and Android devices.
Introduction
What is StrongSwan?
StrongSwan is an open-source IPsec/IKEv2 Virtual Private Network implementation that uses strong encryption standards and authentication methods. It is supported by most modern OSes, such as Linux, Unix, Windows, macOS, and more. At Red Maple we use it for our own hosted VPNs, including a monitored VPN service.
What is mitmproxy?
mitmproxy is a man-in-the-middle tool that is used for proxying HTTPS traffic. It provides researchers a simple way to inspect and modify encrypted network traffic such as, HTTP/1, HTTP/2, WebSockets, or any SSL/TLS-protected protocols. It is developed in Python and comes with a feature-rich library too.
mitmproxy contains optional web interface, where users can view and share exported logs.
Why bother?
For any sort of mobile analysis, using network intercepting proxies like Burp Suite is quite common practice, especially for app testing. However, whilst it’s a great tool, the process of starting up a Burp Proxy listener and then manually changing device network settings can become very tedious.
Having a solution where a device connects to an always-on VPN server that also acts as a intercepting proxy, can be very useful and powerful for initial assessments. You only need to do a one-time set-up that can be enabled/disabled by tapping a UI icon.
Setup Overview
A quick summary of the process steps:
- Install required packages
- Set up and configure the StrongSwan VPN server
- (Optional) replace the mitmproxy default certificates
- Enable port forwarding and add rules with iptables
- Prepare VPN profiles for client devices
- Run the mitmproxy tool
Install Packages
Our setup is running on Ubuntu. First, install the required packages (package names may be different on other platforms):
sudo apt update
sudo apt-get install tmux iptables python3-pip strongswan strongswan-pki libcharon-extra-plugins libcharon-extauth-plugins libstrongswan-extra-plugins -y
I’ve added the tmux package to restore SSH sessions, when network connectivity is lost.
After the above is done, install the mitmproxy tool using the pip3 command:
pip3 install mitmproxy
StrongSwan
In this set-up I will be using certificate-based authentication. StrongSwan uses a Public Key Infrastructure (PKI), which requires us to generate several key pairs. To do this, we can use the ipsec command-line utility. All certificates and private key pairs will live inside the folder /etc/ipsec.d/:
/etc/ipsec.d/cacerts/- root Certificate Authority (CA) certificate./etc/ipsec.d/certs/- server and client certificates (all signed by the root CA)./etc/ipsec.d/private/- all certificate private keys including clients, server, and the root CA.
The main configuration file is located in /etc/ipsec.conf.
Certificates
First, start off by creating a new self-signed root CA certificate:
cd /etc/ipsec.d/
ipsec pki --gen --type rsa --size 4096 --outform pem > private/ca.pem
chmod 600 private/ca.pem
ipsec pki --self --ca --lifetime 3650 --outform pem \
    --in private/ca.pem --type rsa \
	--dn "C=GB, O=Red Maple Tech, CN=Dev VPN MITM Root CA" \
    > cacerts/ca.pem
The --lifetime means it’ll be valid for 10 years. Change the --dn option to your own certificate details.
Next, create a new server certificate and sign it with the root CA certificate:
cd /etc/ipsec.d/
ipsec pki --gen --type rsa --size 2048 --outform pem > private/server.pem
chmod 600 private/server.pem
ipsec pki --pub --in private/server.pem --type rsa | \
    ipsec pki --issue --lifetime 730 --outform pem \
        --cacert cacerts/ca.pem \
        --cakey private/ca.pem \
        --dn "C=GB, O=Red Maple Tech, CN=mitm-vpn.example.com" \
        --san mitm-vpn.example.com \
        --flag serverAuth --flag ikeIntermediate \
    > certs/server.pem
Lastly, create your client certificates. These will be installed on external devices, and also serve as the authentication method.
cd /etc/ipsec.d/
ipsec pki --gen --type rsa --size 2048 --outform pem > private/test-device-1.pem
chmod 600 private/test-device-1.pem
ipsec pki --pub --in private/test-device-1.pem --type rsa | ipsec pki --issue --lifetime 3650 --digest sha256 \
    --cacert cacerts/ca.pem --cakey private/ca.pem --dn "C=GB, O=Red Maple Tech, CN=test-device-1" --san test-device-1 \
    --flag clientAuth --outform pem > certs/test-device-1.pem
Exporting the Certificates
Before moving on to the next section, you may need to export certificates to client devices. Export the root CA certificate (from .pem to .crt), or a client .p12 file that contains both the VPN server certificate and private key. These are required for server verification and authentication.
To export certificates (from pem to crt), you can use openssl utility, type:
openssl x509 -outform der -in cacerts/ca.pem -out cacerts/ca.crt
And to create a .p12 file (you will be asked to enter a passphrase), type:
openssl pkcs12 -export -in certs/test-device-1.pem -inkey private/test-device-1.pem -out certs/test-device-1.p12
Files created
Here is an overview of the files we’ve created inside the /etc/ipsec.d folder:
# tree /etc/ipsec.d
├── aacerts
├── acerts
├── cacerts
│   ├── ca.crt
│   └── ca.pem
├── certs
│   ├── server.pem
│   ├── test-device-1.p12
│   └── test-device-1.pem
├── crls
├── ocspcerts
├── policies
├── private
│   ├── ca.pem
│   ├── server.pem
│   └── test-device-1.pem
└── reqs
IPsec config example
Copy the following /etc/ipsec.conf configuration example, which has been tested and works on both iOS 15.4.1 and Android 10 (using the StrongSwan app). Make sure you update the lines leftcert=server.pem and leftid=mitm-vpn.example.com to reflect your own settings.
config setup
    charondebug="ike 2, knl 2, cfg 2, net 2, esp 2, dmn 2, mgr 2"
    strictcrlpolicy=no
    #uniqueids=yes
    uniqueids=never
    cachecrls=no

conn IPSec-IKEv2-EAP
    leftcert=server.pem
    rightauth=eap
    eap_identity=%any

conn %default
    #auto=add
    compress=no
    type=tunnel
    keyexchange=ikev2
    fragmentation=yes
    forceencaps=yes
    dpdaction=clear
    dpddelay=300s
    rekey=no
    left=%any
    leftauth=pubkey
    leftid=mitm-vpn.example.com
    leftcert=server.pem
    leftsendcert=always
    leftsubnet=0.0.0.0/0
    right=%any
    rightid=%any
    rightauth=pubkey
    rightsourceip=10.10.10.0/24
    rightdns=8.8.8.8,8.8.4.4
    rightsendcert=never
    eap_identity=%identity
    ike=aes128gcm16-sha2_256-prfsha256-ecp256!

conn ikev2-pubkey
    auto=add

conn IPSec-IKEv2-EAP-TLS
    leftcert=server.pem
    rightauth=eap-tls
    eap_identity=%any
Save the file and restart the StrongSwan service with:
sudo systemctl restart strongswan-starter
(Optional) Replace mitmproxy Certificates
mitmproxy doesn’t really require any configuration, as it generates its own root CA and server certificates. To use the VPN (root CA and server) certificates instead, you can replace the default ones stored in ~/.mitmproxy. Make sure you create a backup of the original mitmproxy certificates before doing so.
- Replace the root CA certificate:
cp cacerts/ca.pem ~/.mitmproxy/mitmproxy-ca-cert.pem - Replace the server certificate:
cp certs/ca.pem ~/.mitmproxy/mitmproxy-ca.pem
To view and inspect certificate details, type:
openssl x509 -in mitmproxy-ca-cert.pem -text -noout
Port Forwarding
Before trying to connect to a VPN client, make sure port forwarding is enabled on your VPN system. To enable IPv4 forwarding, as the root user type: sysctl -w net.ipv4.ip_forward=1, and reload sysctl --system config.
Alternatively, you can add the line net.ipv4.ip_forward=1 to /etc/sysctl.conf and reboot the system.
No Internet Connectivity on VPN clients
I ran into the problem where VPN clients were not getting Internet access. This was because I had forgotten to add an iptables MASQUERADE rule to the NAT table. Make sure you add this rule, type:
sudo iptables -t nat -A POSTROUTING -o ens4 -j MASQUERADE
Replace the -o option with your own network interface.
Forward VPN Client HTTP/HTTPS Traffic
Create port-specific iptables rules (replace -i and -s with your own settings) to forward all HTTP/HTTPS traffic on default ports to our mitmproxy tool. To do this, type:
sudo iptables -t nat -A PREROUTING -i ens4 -s 10.10.10.1/24 --dport 80 -j REDIRECT --to-port 8080
sudo iptables -t nat -A PREROUTING -i ens4 -s 10.10.10.1/24 --dport 443 -j REDIRECT --to-port 8080
A breakdown of the options:
-t natuse the NAT table.-A PREROUTINGappend the rule to NAT’s PREROUTING.-i ens4specifies network interface name.-s 10.10.10.1/24source IP address range (VPN clients).--dport 443destination port (default HTTPS).-j REDIRECTaction taken if a rule is matches.--to-port 8080redirect traffic to the mitmproxy listener.
Note, these rules are discarded after a system reboot (you can use iptables-persistent package).
Client Devices
Create a .mobileconfig profile for Apple devices
On Apple devices, configuration profiles (ending .mobileconfig) automate the process of setting policies, configuring VPNs, restrictions, and much more. Here, we use a slightly modified bash script (source), to generate our custom VPN profiles for Apple devices.
To generate .mobileconfig profile, run the script on the VPN server, also making sure you supply your own settings.
#!/bin/zsh

#### REPLACE BELOW
CLIENT="test-device-1"
SERVER="server"
NAME="RMT TLS MITM"
FQDN="mitm-vpn.example.com"
IP_ADDR="xx.xx.xx.xx"
CA="ca"
#### END

# WiFi SSIDs that do not require automatic connection to VPN on network change
TRUSTED_SSIDS=("")

PAYLOADCERTIFICATEUUID=$( cat /proc/sys/kernel/random/uuid )
PKCS12PASSWORD=$( cat /proc/sys/kernel/random/uuid )

cat << EOF
<?xml version="1.0" encoding="UTF-8"?>
<!DOCTYPE plist PUBLIC "-//Apple//DTD PLIST 1.0//EN" "http://www.apple.com/DTDs/PropertyList-1.0.dtd">
<plist version="1.0">
<dict>
    <key>PayloadDisplayName</key>
    <string>${NAME} VPN</string>
    <key>PayloadIdentifier</key>
    <string>${FQDN}</string>
    <key>PayloadUUID</key>
    <string>$( cat /proc/sys/kernel/random/uuid )</string>
    <key>PayloadType</key>
    <string>Configuration</string>
    <key>PayloadVersion</key>
    <integer>1</integer>
    <key>PayloadContent</key>
    <array>
        <dict>
            <key>PayloadDisplayName</key>
            <string>${NAME} VPN</string>
            <key>PayloadDescription</key>
            <string>Configure VPN</string>
            <key>UserDefinedName</key>
            <string>${NAME}</string>
            <key>VPNType</key>
            <string>IKEv2</string>
            <key>IKEv2</key>
            <dict>
                <key>RemoteAddress</key>
                <string>${IP_ADDR}</string>
                <key>RemoteIdentifier</key>
                <string>${FQDN}</string>
                <key>LocalIdentifier</key>
                <string>${CLIENT}</string>
                <key>AuthenticationMethod</key>
                <string>Certificate</string>
                <key>PayloadCertificateUUID</key>
                <string>${PAYLOADCERTIFICATEUUID}</string>
                <key>CertificateType</key>
                <string>RSA</string>
                <key>ServerCertificateIssuerCommonName</key>
                <string>${FQDN}</string>
                <key>EnablePFS</key>
                <integer>1</integer>
                <key>IKESecurityAssociationParameters</key>
                <dict>
                    <key>EncryptionAlgorithm</key>
                    <string>AES-128-GCM</string>
                    <key>IntegrityAlgorithm</key>
                    <string>SHA2-256</string>
                    <key>DiffieHellmanGroup</key>
                    <integer>19</integer>
                </dict>
                <key>ChildSecurityAssociationParameters</key>
                <dict>
                    <key>EncryptionAlgorithm</key>
                    <string>AES-128-GCM</string>
                    <key>IntegrityAlgorithm</key>
                    <string>SHA2-256</string>
                    <key>DiffieHellmanGroup</key>
                    <integer>19</integer>
                </dict>
                <key>OnDemandEnabled</key>
                <integer>0</integer>
                <key>OnDemandRules</key>
                <array>
                    <dict>
                        <key>InterfaceTypeMatch</key>
                        <string>WiFi</string>
                        <key>SSIDMatch</key>
                        <array>
`for x in ${TRUSTED_SSIDS}; echo "                            <string>$x</string>"`
                        </array>
                        <key>Action</key>
                        <string>Disconnect</string>
                    </dict>
                    <dict>
                        <key>InterfaceTypeMatch</key>
                        <string>Cellular</string>
                        <key>Action</key>
                        <string>Disconnect</string>
                    </dict>
                    <dict>
                        <key>Action</key>
                        <string>Connect</string>
                    </dict>
                </array>
            </dict>
            <key>PayloadType</key>
            <string>com.apple.vpn.managed</string>
            <key>PayloadIdentifier</key>
            <string>com.apple.vpn.managed.${SERVER}</string>
            <key>PayloadUUID</key>
            <string>$( cat /proc/sys/kernel/random/uuid )</string>
            <key>PayloadVersion</key>
            <integer>1</integer>
        </dict>
        <dict>
            <key>PayloadDisplayName</key>
            <string>${CLIENT}.p12</string>
            <key>PayloadDescription</key>
            <string>Add PKCS#12 certificate</string>
            <key>PayloadCertificateFileName</key>
            <string>${CLIENT}.p12</string>
            <key>Password</key>
            <string>${PKCS12PASSWORD}</string>
            <key>PayloadContent</key>
            <data>
$( openssl pkcs12 -export -inkey /etc/ipsec.d/private/${CLIENT}.pem -in /etc/ipsec.d/certs/${CLIENT}.pem -name "${CLIENT}" -certfile /etc/ipsec.d/cacerts/${CA}.pem -password pass:${PKCS12PASSWORD} | base64 )
            </data>
            <key>PayloadType</key>
            <string>com.apple.security.pkcs12</string>
            <key>PayloadIdentifier</key>
            <string>com.apple.security.pkcs12.${CLIENT}</string>
            <key>PayloadUUID</key>
            <string>${PAYLOADCERTIFICATEUUID}</string>
            <key>PayloadVersion</key>
            <integer>1</integer>
        </dict>
        <dict>
            <key>PayloadDisplayName</key>
            <string>${SERVER} CA</string>
            <key>PayloadDescription</key>
            <string>Add CA root certificate</string>
            <key>PayloadCertificateFileName</key>
            <string>ca.pem</string>
            <key>PayloadContent</key>
            <data>
$( cat /etc/ipsec.d/cacerts/${CA}.pem | base64 )
            </data>
            <key>PayloadType</key>
            <string>com.apple.security.root</string>
            <key>PayloadIdentifier</key>
            <string>com.apple.security.root.${SERVER}</string>
            <key>PayloadUUID</key>
            <string>$( cat /proc/sys/kernel/random/uuid )</string>
            <key>PayloadVersion</key>
            <integer>1</integer>
        </dict>
    </array>
</dict>
</plist>
EOF
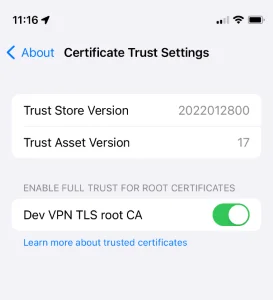
Next, upload the .mobileconfig file to your device and install it by going to Settings. Make sure you trust the root CA by going to Settings > General > About > Certificate Trust Settings and enable Full Trust:
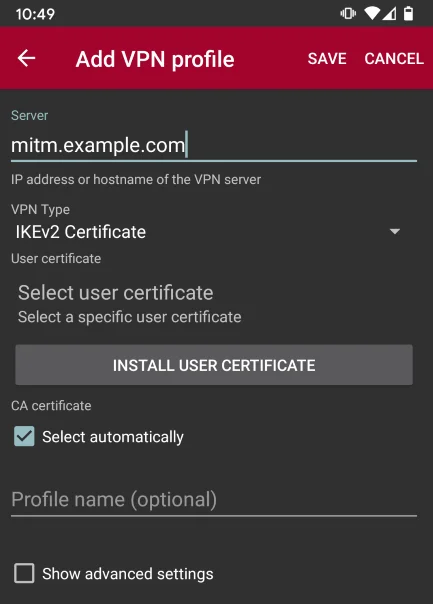
Use StrongSwan app for Android devices
On Android devices, install the official StrongSwan app and import the .p12 file to the device. To connect to the VPN server, create a new VPN profile and set the VPN Type as IKEv2 Certificate, then install the certificate from your device. You will be asked to enter the certificate passphrase.
You can configure the quick access panel to enable/disable the VPN.
Launching mitmproxy
To start the mitmproxy tool, type :
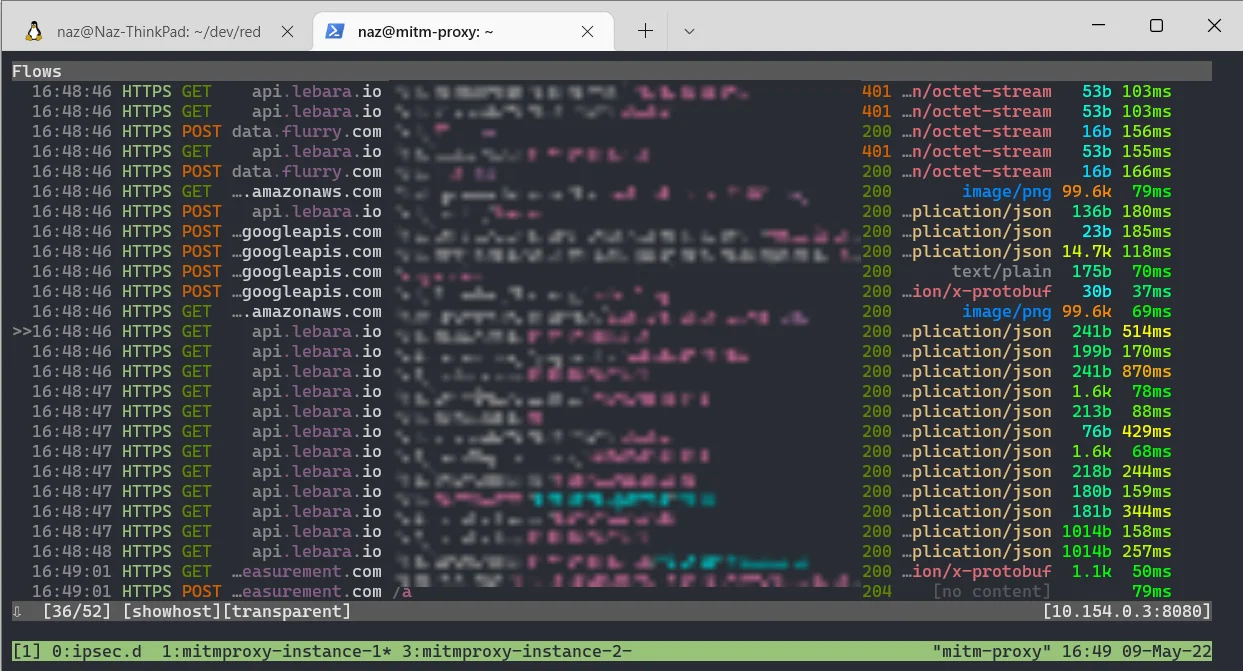
mitmproxy --listen-host 10.154.0.3 --listen-port 8080 --showhost --mode transparent
The options in the example are:
--listen-hostIP address of private network address--listen-portdefault proxy port 8080--showhostshows hostname instead of IP address--modeyou must use transparent
If it’s working you should start to see traffic:
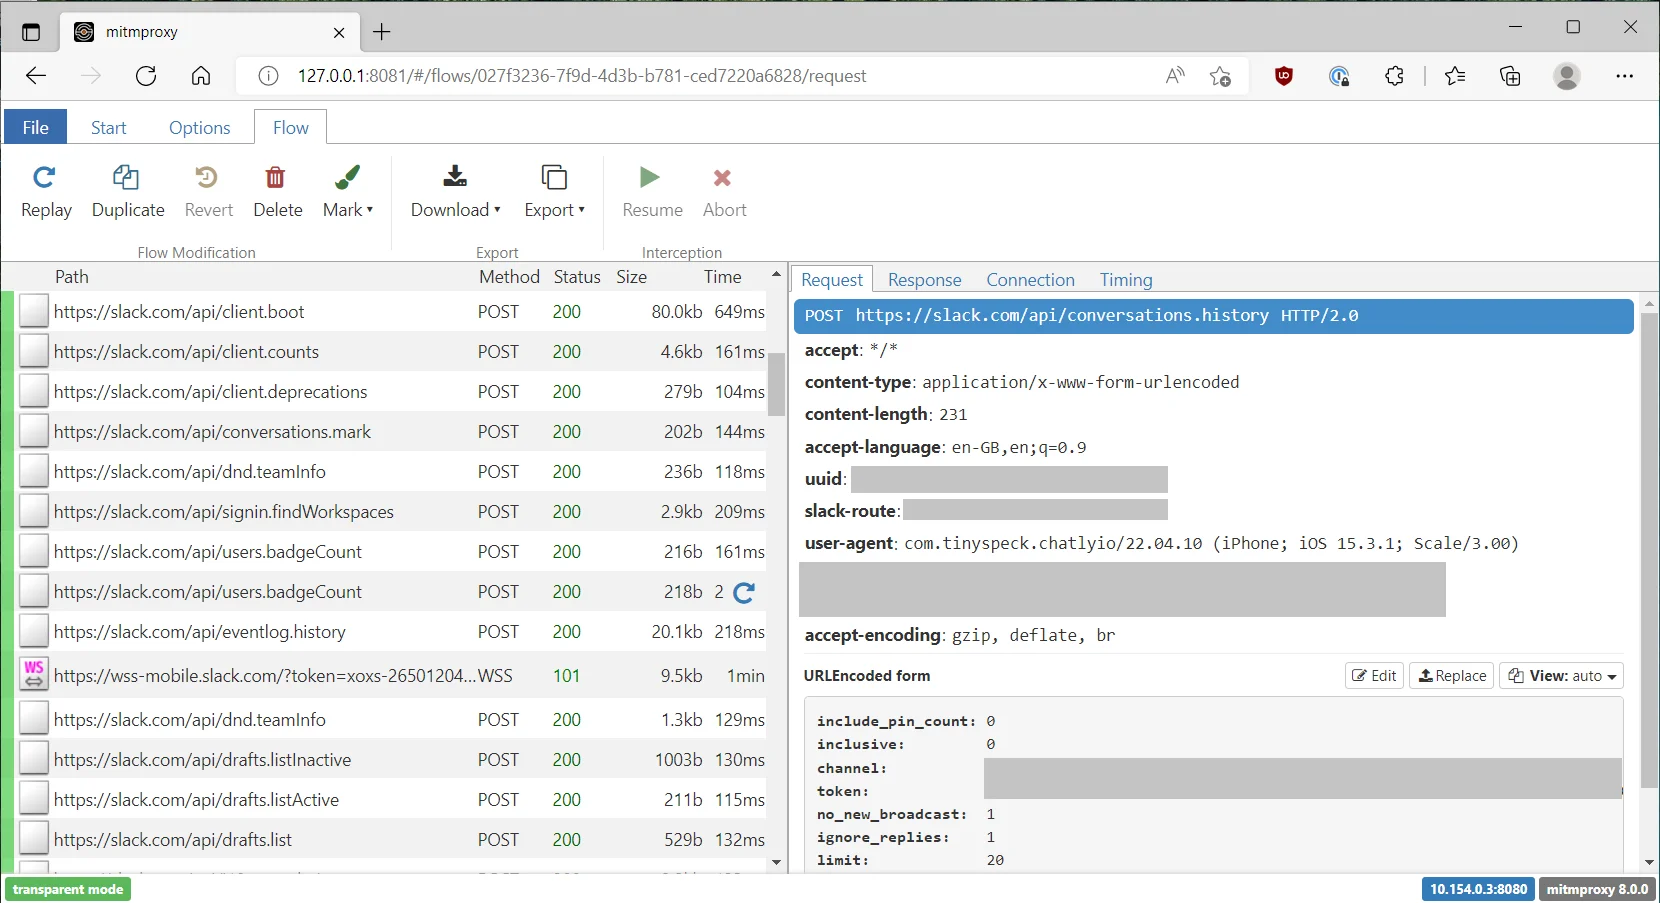
To use the mitmproxy web interface, type:
mitmweb --listen-host 10.154.0.3 --listen-port 8080 --no-web-open-browser --mode transparent
Here is an example of mitmweb viewing encrypted Slack app network traffic on an iOS device.
I highly recommend using a tmux session whenever logging in to the SSH server. This way, if you lose network connectivity you can still get back to your session and continue where you left off.
Bonus: SSH port forwarding
You can also use SSH port forwarding to access the mitmproxy web interface from your local browser. By default, the web interface runs on localhost and uses HTTP on port 8081.
To get access to this on our local machine you can set-up a simple local port forward by typing: ssh -L 8081:127.0.0.1:8081 user@vpn-server, once connected you can open a local browser and navigate to http://127.0.0.1:8081, as if we we were on the VPN server.
Limitations
- Device must actually support the installation of root CA certificates.
- System or apps may refuse or not respect the VPN network configuration.
- Certificate Transparency and Certificate Pinning - use Frida to bypass ;)
Links
- Setting up StrongSwan guide (https://wiki.archlinux.org/title/StrongSwan)
- mitmproxy docs (https://docs.mitmproxy.org/stable/)
- StrongSwan (https://docs.strongswan.org/docs/5.9/index.html)
- mobileconfig.sh script (https://gist.github.com/borisovonline/955b7c583c049464c878bbe43329a521#file-mobileconfig-sh)
- Hunting for Bitwarden master passwords stored in memory
- Security Advisory - Vulnerabilities with Crocus Iris App
- Parental Protections Pose Problems for PlusNet Pixel Patching

|
Naz is an OSCP-certified technical cyber security professional with experience in security and penetration testing, and vulnerability research. Naz has found credited vulnerabilities in hardware devices, mobile and web applications. At Red Maple he helped to deliver our cyber security consulting services, until his departure in April 2024. He still blogs on his personal blog. |